Home Soldering wires to battery terminals
Soldering wires to battery terminals
Category: GuidePosted by Fallingwater on 06 August 2011
Original article date: 9th November 2008
If you're a tinkerer, or a hardware hacker, or simply into electronics, it's a safe bet that you'll eventually want to string up some cells and create a pack for one of your applications.
If the cells are common AAs or AAAs and if your application doesn't draw much power, then it's just a matter of heading over to the nearest electronics store. Grab a few battery holders for very little money and you're set.
But if the cells are non-standard, or square, or just uncommon enough that there aren't readily available holders, then you've got a problem.
Another reason why you might want to avoid holders is if your application draws enough current that terminal resistance and wire size become a concern (holders are usually made with really thin wires).
If you're ordering cells specifically for your application, you can get around this by ordering pre-tabbed cells and soldering your wires to the tabs.
But this isn't always an option. Maybe your chosen cell size doesn't come with tabs, or you already have the appropriate untabbed cells and would rather not have to order more.
So you cut a few nickel tabs off your roll of nickel sheeting, fire up your specialized spot welder and weld the tabs to the cells yourself.
What's that you say? You think those those welders are mind-bendingly overpriced? Welcome to the club. Thankfully, if you want a tab welder you can always roll your own for cheap.
If you don't want to invest time and resources into a welder project, however, you can go the easy way and just solder the wires directly to the cells.
Ask about this in electronics-related message boards and people are likely to tell you that it's complicated, and dangerous, and you shouldn't do it lest your cells blow up, set fire to your home and/or open a wormhole to a dimension of pure evil.
I respectfully disagree. Soldering to cells is a bit tricky, but it's eminently doable; I've done it plenty of times, and I haven't yet managed to unleash legions of unspeakable abominations upon our world.
Soldering to cells is not like soldering to wires, or to a circuit board.
Inexperienced amateur solderers are often frustrated when they try to solder to cells because the solder doesn't stick, or it looks like it does but then gives up as soon as the wire is tugged. They then usually assume that the cell terminals are treated with some anti-solder compound or something and give up.
The truth is much simpler: it has nothing to do with special treatment of the metal - it's just a question of heat.
Solder sticks to metal when the temperature of the metal gets high enough. This process isn't helped by the fact that most metals are rather good heat conductors, and will try their best to spread the heat and get it away from the area you want to solder to.
This isn't usually a problem with normal electronics work, because thin wires and circuit terminals have little mass to spread the heat to, so even a cheap, weedy iron will heat them to soldering temperature with ease.
But cells have a lot more metal than a wire, and so are a lot harder to heat properly.
For this reason, the $10 soldering irons that most budding tinkerers use aren't suitable to the task. You can do it with them, but you run the very real risk of overheating the cells.
Overheated cells don't instantly die. Overheat them slightly and you'll just cook some of the electrolyte in them; they'll lose some capacity, and gain some internal resistance, and you can't expect them to last as long as pristine cells, but by and large they'll still work (note that this isn't necessarily true for Lithium-ion cells; more on this later).
But if you want to do it properly, a temperature-controlled soldering station is necessary.
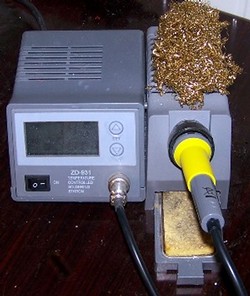
I have this fancy one, with a LCD readout and very precise temperature setting; it cost me 60 euro (approximately US$76 at the time of writing). The fanciness is nice to have, but isn't really necessary; you can get cheaper stations with simple LED readouts and temperature knobs that'll work just as fine for most jobs, definitely including cell soldering. Just make sure the one you choose has proper temperature controls, and not just two or three selectable levels. For a decent one, look here.
If soldering is one of your normal activities, by the way, I heartily suggest you get a temperature-controlled station even if you don't need it for special applications. When I got mine the number of dry joints produced dropped dramatically, and soldering actually became fun.
You can also use a gas-powered soldering iron; when the heat is created by a direct flame it's a lot easier to generate rather impressive amounts of it (the downside is, of course, that you consume fuel). But you're going to have to figure out the appropriate setting by yourself, since gas irons don't have thermostats and heat settings vary widely inbetween brands and models.
You can pretty much solder all day long to NiCD and NiMH cells, and the worst that can happen if you overdo it is that they get ruined and you have to throw them away. Lithium-ion cells, in contrast, have been known to violently catch fire when mistreated, and some people think that merely looking at them the wrong way is tantamount to inviting them to burn down your house.
Personally I haven't yet had trouble with LiIon cells, and this includes soldering to many of them. I don't think the heat from a quick solder joint is enough to melt/degrade their internal passive protection or cause significant damage to the separator material inside. Others, however, think I'm wrong, and have repeatedly told me soldering to LiIon cells is irresponsible.
I remain of my opinion, and I'm unlikely to change it unless I myself blow a cell through simple soldering or conclusive proof is presented to me that someone else did. However, since I acknowledge the fact that I'm not perfect and that I may, in fact, be wrong (gasp!), I urge you to read the whole of this chapter before soldering to LiIon cells.
While a cheapie iron can be used on NiCD and NiMH cells, you really shouldn't use one to solder to LiIon cells, as the amount of heat the cells have to absorb is significantly lower with a soldering station. So get one.
Always be ready for the worst, no matter how unlikely it might be that it happens. Ideally you should do the soldering in an open area (say, a balcony) on an inert surface (stone is good, wood is not) and with no flammable materials nearby; this way if a cell does blow you can just take a few steps back and watch the fireworks, confident that nothing of value is going to be destroyed.
If you don't have easy access to such a location, make sure to have in close proximity to your work area a fire resistant container (ideally a fireproof box, but a thick metal pot will do in a pinch) and a large bucket full of sand.
Why sand? Because lithium-based fires are surprisingly nasty. You can't douse them with water (it might actually make things worse), and CO2 and Halon extinguishers won't work. The only reliable way to kill a lithium fire is by smothering it in sand.
So if your cell starts overheating and/or smoking while you're soldering to it, quickly throw it in the container and dump the whole bucket of sand on it. Then open the windows, and don't breathe any of the fumes coming out of the cell - they can be quite toxic.
You should also do a full charge-discharge cycle of the cell/pack after you're done soldering; since accidents involving rechargeable lithium cells almost always happen during charging, you need to test that the pack can safely take a charge.
Some say that you can't be safe even if everything goes right, because you cannot know for sure what sort of unspeakable evil is now lurking inside the cell after you've heated it, and it might bite you in the ass when you least expect it.
Personally I think that's crossing the border between prudence and paranoia; however, since you can never be too careful, I'm adding a big fat...
DISCLAIMER
I've soldered to LiIon cells more times than I care to remember and I've yet to see any blow up, either during charge or during use. However, if you have more talent for spectacular failure than me and somehow manage to make any catch fire and/or go kaboom, I ASSUME NO RESPONSIBILITY - you follow this page's advice at your own risk.
There, this oughta do it.
There is, by the way, another thing that can cause problems with LiIon cells, but only protected ones. The protection circuit itself is seated on the negative terminal of the cell, and heating its contact in order to solder to it can cause the components of the circuit itself to be unsoldered from the board, or to slide down it and contact places they shouldn't.
This can cause the circuit to fail; when this happens it usually goes open circuit, but there have been reported cases of failed protection going permanently closed. In this case, the cell becomes to all intents and purposes unprotected. It's also conceivable that the circuit might become messed up enough to short the cell, and then all bets are off.
If you need to solder to a protected cell, strip the insulating sleeve off the circuit, lift it off the cell (don't disconnect anything), check with a multimeter where the component side of the board is connected to the terminal side and solder your wire there. Reassemble with electric tape, making doubly sure that your soldered wire doesn't contact anything it shouldn't.
The first step is to scuff up the surface of the terminals. They are usually very flat, and solder doesn't much like sticking to flat surfaces.
You can do this with just a piece of sandpaper, but it's hard not to ruin the plastic covering at the ends of the cell with that. You can use a sanding attachment on a Dremel or similar rotary tool, but it has the same problem.
I use a Dremel cutting disk.
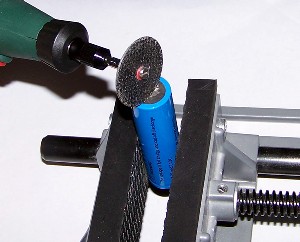
They are meant for cutting (duh), but if you keep the speed down they do just fine for sanding, and the circular shape makes it easy to sand just the center of the terminals while leaving the rest untouched.
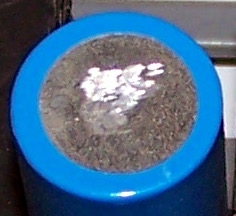
Don't overdo it; you don't want to reduce the thickness of the terminals, and you certainly don't want to cut them. You're looking for a result like this:
Next clamp the cell in a bench vise (don't overdo it here, either), get your rosin-core solder and crank the soldering station to its maximum temperature (usually 450°C).
Applying more heat when you're trying to avoid cooking the cells sounds stupid, but isn't. More heat means the metal will have a harder time spreading it, you'll get the solder to stick on the cell faster, and the net result is that the terminal will become touchable again in just a few seconds.
Put the tip of the iron on the terminal of the cell, but don't use the pointy end - use the side. This will allow more heat to flow.

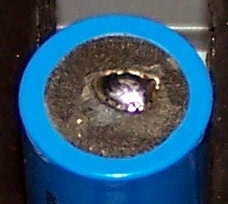
With a proper iron set to 450°C you only need to keep it there a couple of seconds; in contrast, a cheapie will need to be kept on the terminal for anywhere between six to ten seconds. Then you take your solder wire, apply it right where the tip meets the terminal (red square in the above image, which you can click to get a bigger version), and let some of it melt. If you've done everything right it'll instantly stick to the terminal in a nice little pool.
If you haven't done everything right, then the solder will make a ball on the terminal and promptly roll off, or look like it's adhered but then detach as soon as you touch it.
If this happens, it means you haven't heated up the terminals enough - which in turn almost certainly means you're using a cheapie iron.
If your attempt fails and the joint detaches (or never forms), don't just reheat the solder and try to get it to stick anyway; this practically never works, as the flux inside the solder will all have evaporated, and getting solder to stick without the help of the flux is an incredibly frustrating experience. Discard the failed joint, let the cell cool down and try again with fresh solder, this time leaving the iron on the terminal a bit longer.
By now you might have noticed that there aren't any wires being soldered on the terminals yet. This is because wires, too, suck up heat from your soldering area. What we do instead is to first put solder on the cells, let them cool down, and then melt the joints again - the correct term is "reflow" - while applying the wires.
It's important to use wire of the right size: the more current your cell/pack has to deliver, the more wire resistance will matter.
Wire resistance gets lower as the wires get thicker, so make sure to run power-hungry applications with appropriately chunky wire. Failure to do so will cause the wires to overheat, and the voltage at the end of them to drop. Overdo it and the wires can become scalding hot; overdo it drastically and they can melt and snap, not to mention get white-hot and set fire to things.
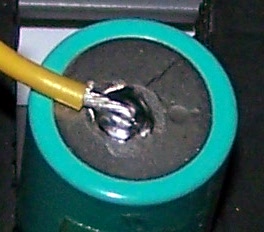
So get the appropriate wires, cut to desired length, strip one end and tin the braid. Just one end: you want to minimize the chance of a short circuit later on when both wires will be connected.
Place the wire right next to the pool of solder, apply the iron, and when it melts slide the wire in. This shouldn't take more than a second or two. Now remove the iron, but keep the wire in place for a second or three; solder doesn't harden instantly, and if you immediately stop holding the wire it'll just drop off - possibly spraying little globs of molten solder around as it does so.
It helps if you have a steady hand. Solder joints don't particularly like to harden with a wire inside them that's twitching all over the place, and tend to be significantly weaker when that happens.
Also note that you want to use either gloves or pincers to keep the wire in place; as mentioned earlier, wires do a good job of sucking up heat, and the plastic cover can become scalding hot surprisingly quickly.
Once all is done, give a tug or two to the wire to make sure the joint holds.
Once you've made a satisfactory joint, flip the cell and do the same on the other terminal. Note that it might take a bit less heating time for the solder to stick on the positive terminal, since it's in contact with less metal than the negative one.
When that's done, strip and connect the wires to the desired application one at a time. Voila, you're done.
If you're building a pack, put solder on all the cells' terminals, then set them in the shape you want the pack to have before doing the connections. Use melt glue or duct tape to hold them together as you do the job.
The technique described in this page can be applied to any metal-cased cell, even prismatic (square) ones.
Now that you know the ABC, get some old dead primary cells and practice on them. A few attempts should be all it takes for you to get it straight. Happy soldering!
If you're a tinkerer, or a hardware hacker, or simply into electronics, it's a safe bet that you'll eventually want to string up some cells and create a pack for one of your applications.
If the cells are common AAs or AAAs and if your application doesn't draw much power, then it's just a matter of heading over to the nearest electronics store. Grab a few battery holders for very little money and you're set.
But if the cells are non-standard, or square, or just uncommon enough that there aren't readily available holders, then you've got a problem.
Another reason why you might want to avoid holders is if your application draws enough current that terminal resistance and wire size become a concern (holders are usually made with really thin wires).
If you're ordering cells specifically for your application, you can get around this by ordering pre-tabbed cells and soldering your wires to the tabs.
But this isn't always an option. Maybe your chosen cell size doesn't come with tabs, or you already have the appropriate untabbed cells and would rather not have to order more.
So you cut a few nickel tabs off your roll of nickel sheeting, fire up your specialized spot welder and weld the tabs to the cells yourself.
What's that you say? You think those those welders are mind-bendingly overpriced? Welcome to the club. Thankfully, if you want a tab welder you can always roll your own for cheap.
If you don't want to invest time and resources into a welder project, however, you can go the easy way and just solder the wires directly to the cells.
Ask about this in electronics-related message boards and people are likely to tell you that it's complicated, and dangerous, and you shouldn't do it lest your cells blow up, set fire to your home and/or open a wormhole to a dimension of pure evil.
I respectfully disagree. Soldering to cells is a bit tricky, but it's eminently doable; I've done it plenty of times, and I haven't yet managed to unleash legions of unspeakable abominations upon our world.
The problem
Soldering to cells is not like soldering to wires, or to a circuit board.
Inexperienced amateur solderers are often frustrated when they try to solder to cells because the solder doesn't stick, or it looks like it does but then gives up as soon as the wire is tugged. They then usually assume that the cell terminals are treated with some anti-solder compound or something and give up.
The truth is much simpler: it has nothing to do with special treatment of the metal - it's just a question of heat.
Solder sticks to metal when the temperature of the metal gets high enough. This process isn't helped by the fact that most metals are rather good heat conductors, and will try their best to spread the heat and get it away from the area you want to solder to.
This isn't usually a problem with normal electronics work, because thin wires and circuit terminals have little mass to spread the heat to, so even a cheap, weedy iron will heat them to soldering temperature with ease.
But cells have a lot more metal than a wire, and so are a lot harder to heat properly.
Tools
For this reason, the $10 soldering irons that most budding tinkerers use aren't suitable to the task. You can do it with them, but you run the very real risk of overheating the cells.
Overheated cells don't instantly die. Overheat them slightly and you'll just cook some of the electrolyte in them; they'll lose some capacity, and gain some internal resistance, and you can't expect them to last as long as pristine cells, but by and large they'll still work (note that this isn't necessarily true for Lithium-ion cells; more on this later).
But if you want to do it properly, a temperature-controlled soldering station is necessary.
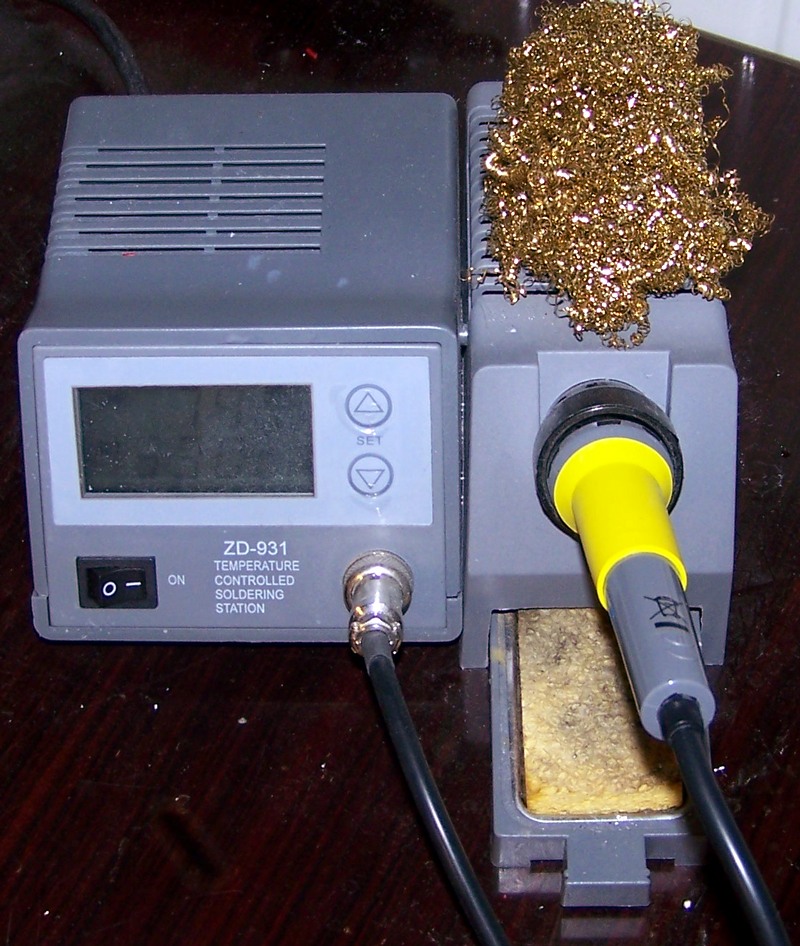
I have this fancy one, with a LCD readout and very precise temperature setting; it cost me 60 euro (approximately US$76 at the time of writing). The fanciness is nice to have, but isn't really necessary; you can get cheaper stations with simple LED readouts and temperature knobs that'll work just as fine for most jobs, definitely including cell soldering. Just make sure the one you choose has proper temperature controls, and not just two or three selectable levels. For a decent one, look here.
If soldering is one of your normal activities, by the way, I heartily suggest you get a temperature-controlled station even if you don't need it for special applications. When I got mine the number of dry joints produced dropped dramatically, and soldering actually became fun.
You can also use a gas-powered soldering iron; when the heat is created by a direct flame it's a lot easier to generate rather impressive amounts of it (the downside is, of course, that you consume fuel). But you're going to have to figure out the appropriate setting by yourself, since gas irons don't have thermostats and heat settings vary widely inbetween brands and models.
Safety and LiIon cells
You can pretty much solder all day long to NiCD and NiMH cells, and the worst that can happen if you overdo it is that they get ruined and you have to throw them away. Lithium-ion cells, in contrast, have been known to violently catch fire when mistreated, and some people think that merely looking at them the wrong way is tantamount to inviting them to burn down your house.
Personally I haven't yet had trouble with LiIon cells, and this includes soldering to many of them. I don't think the heat from a quick solder joint is enough to melt/degrade their internal passive protection or cause significant damage to the separator material inside. Others, however, think I'm wrong, and have repeatedly told me soldering to LiIon cells is irresponsible.
I remain of my opinion, and I'm unlikely to change it unless I myself blow a cell through simple soldering or conclusive proof is presented to me that someone else did. However, since I acknowledge the fact that I'm not perfect and that I may, in fact, be wrong (gasp!), I urge you to read the whole of this chapter before soldering to LiIon cells.
While a cheapie iron can be used on NiCD and NiMH cells, you really shouldn't use one to solder to LiIon cells, as the amount of heat the cells have to absorb is significantly lower with a soldering station. So get one.
Always be ready for the worst, no matter how unlikely it might be that it happens. Ideally you should do the soldering in an open area (say, a balcony) on an inert surface (stone is good, wood is not) and with no flammable materials nearby; this way if a cell does blow you can just take a few steps back and watch the fireworks, confident that nothing of value is going to be destroyed.
If you don't have easy access to such a location, make sure to have in close proximity to your work area a fire resistant container (ideally a fireproof box, but a thick metal pot will do in a pinch) and a large bucket full of sand.
Why sand? Because lithium-based fires are surprisingly nasty. You can't douse them with water (it might actually make things worse), and CO2 and Halon extinguishers won't work. The only reliable way to kill a lithium fire is by smothering it in sand.
So if your cell starts overheating and/or smoking while you're soldering to it, quickly throw it in the container and dump the whole bucket of sand on it. Then open the windows, and don't breathe any of the fumes coming out of the cell - they can be quite toxic.
You should also do a full charge-discharge cycle of the cell/pack after you're done soldering; since accidents involving rechargeable lithium cells almost always happen during charging, you need to test that the pack can safely take a charge.
Some say that you can't be safe even if everything goes right, because you cannot know for sure what sort of unspeakable evil is now lurking inside the cell after you've heated it, and it might bite you in the ass when you least expect it.
Personally I think that's crossing the border between prudence and paranoia; however, since you can never be too careful, I'm adding a big fat...
I've soldered to LiIon cells more times than I care to remember and I've yet to see any blow up, either during charge or during use. However, if you have more talent for spectacular failure than me and somehow manage to make any catch fire and/or go kaboom, I ASSUME NO RESPONSIBILITY - you follow this page's advice at your own risk.
There, this oughta do it.
There is, by the way, another thing that can cause problems with LiIon cells, but only protected ones. The protection circuit itself is seated on the negative terminal of the cell, and heating its contact in order to solder to it can cause the components of the circuit itself to be unsoldered from the board, or to slide down it and contact places they shouldn't.
This can cause the circuit to fail; when this happens it usually goes open circuit, but there have been reported cases of failed protection going permanently closed. In this case, the cell becomes to all intents and purposes unprotected. It's also conceivable that the circuit might become messed up enough to short the cell, and then all bets are off.
If you need to solder to a protected cell, strip the insulating sleeve off the circuit, lift it off the cell (don't disconnect anything), check with a multimeter where the component side of the board is connected to the terminal side and solder your wire there. Reassemble with electric tape, making doubly sure that your soldered wire doesn't contact anything it shouldn't.
Step-by-step guide
The first step is to scuff up the surface of the terminals. They are usually very flat, and solder doesn't much like sticking to flat surfaces.
You can do this with just a piece of sandpaper, but it's hard not to ruin the plastic covering at the ends of the cell with that. You can use a sanding attachment on a Dremel or similar rotary tool, but it has the same problem.
I use a Dremel cutting disk.

They are meant for cutting (duh), but if you keep the speed down they do just fine for sanding, and the circular shape makes it easy to sand just the center of the terminals while leaving the rest untouched.
Don't overdo it; you don't want to reduce the thickness of the terminals, and you certainly don't want to cut them. You're looking for a result like this:
Next clamp the cell in a bench vise (don't overdo it here, either), get your rosin-core solder and crank the soldering station to its maximum temperature (usually 450°C).
Applying more heat when you're trying to avoid cooking the cells sounds stupid, but isn't. More heat means the metal will have a harder time spreading it, you'll get the solder to stick on the cell faster, and the net result is that the terminal will become touchable again in just a few seconds.
Put the tip of the iron on the terminal of the cell, but don't use the pointy end - use the side. This will allow more heat to flow.
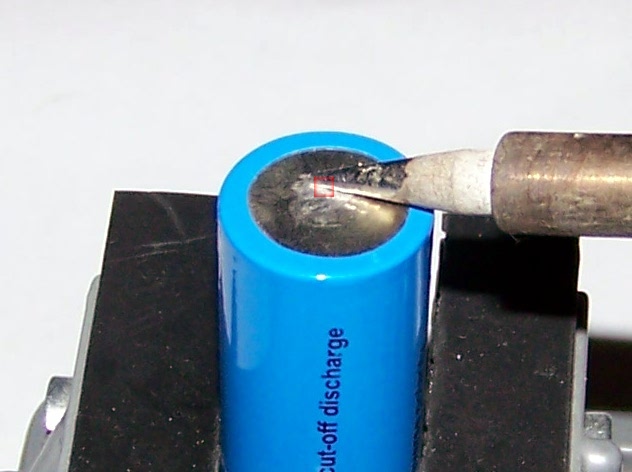
With a proper iron set to 450°C you only need to keep it there a couple of seconds; in contrast, a cheapie will need to be kept on the terminal for anywhere between six to ten seconds. Then you take your solder wire, apply it right where the tip meets the terminal (red square in the above image, which you can click to get a bigger version), and let some of it melt. If you've done everything right it'll instantly stick to the terminal in a nice little pool.
If you haven't done everything right, then the solder will make a ball on the terminal and promptly roll off, or look like it's adhered but then detach as soon as you touch it.
If this happens, it means you haven't heated up the terminals enough - which in turn almost certainly means you're using a cheapie iron.
If your attempt fails and the joint detaches (or never forms), don't just reheat the solder and try to get it to stick anyway; this practically never works, as the flux inside the solder will all have evaporated, and getting solder to stick without the help of the flux is an incredibly frustrating experience. Discard the failed joint, let the cell cool down and try again with fresh solder, this time leaving the iron on the terminal a bit longer.
By now you might have noticed that there aren't any wires being soldered on the terminals yet. This is because wires, too, suck up heat from your soldering area. What we do instead is to first put solder on the cells, let them cool down, and then melt the joints again - the correct term is "reflow" - while applying the wires.
Wiring
It's important to use wire of the right size: the more current your cell/pack has to deliver, the more wire resistance will matter.
This is, by the way, just how electric igniters work. They have a little lump of the same stuff match heads are made of placed on a small length of high-resistance wire (usually nichrome, but DIYers often use the thin iron wire you can find in twist-ties). Electric current flows through the wire, resistance causes it to get hot, and the "match head" ignites.
Wire resistance gets lower as the wires get thicker, so make sure to run power-hungry applications with appropriately chunky wire. Failure to do so will cause the wires to overheat, and the voltage at the end of them to drop. Overdo it and the wires can become scalding hot; overdo it drastically and they can melt and snap, not to mention get white-hot and set fire to things.
So get the appropriate wires, cut to desired length, strip one end and tin the braid. Just one end: you want to minimize the chance of a short circuit later on when both wires will be connected.
Place the wire right next to the pool of solder, apply the iron, and when it melts slide the wire in. This shouldn't take more than a second or two. Now remove the iron, but keep the wire in place for a second or three; solder doesn't harden instantly, and if you immediately stop holding the wire it'll just drop off - possibly spraying little globs of molten solder around as it does so.
It helps if you have a steady hand. Solder joints don't particularly like to harden with a wire inside them that's twitching all over the place, and tend to be significantly weaker when that happens.
Also note that you want to use either gloves or pincers to keep the wire in place; as mentioned earlier, wires do a good job of sucking up heat, and the plastic cover can become scalding hot surprisingly quickly.
Once all is done, give a tug or two to the wire to make sure the joint holds.
Once you've made a satisfactory joint, flip the cell and do the same on the other terminal. Note that it might take a bit less heating time for the solder to stick on the positive terminal, since it's in contact with less metal than the negative one.
When that's done, strip and connect the wires to the desired application one at a time. Voila, you're done.
If you're building a pack, put solder on all the cells' terminals, then set them in the shape you want the pack to have before doing the connections. Use melt glue or duct tape to hold them together as you do the job.
Conclusion
Lithium polymer cells are not metal-cased, so you can't solder to them using this method.
The technique described in this page can be applied to any metal-cased cell, even prismatic (square) ones.
Now that you know the ABC, get some old dead primary cells and practice on them. A few attempts should be all it takes for you to get it straight. Happy soldering!
No comments for this article